After reading the blog, you too would understand how to mount, access, read and write to a linux formatted pendrive or hard drive using EXT4 filesystem on a MacOS which otherwise needs a Linux VM to run or some paid software to be downloaded.
What happened to Vipul? Is he okay? MacOS?
Yes, this is Vipul. Thanks for caring. In 2016, I switched to Ubuntu. It was a good life. Following that I never looked back and here we are. Recently my laptop, Thinkpad T490 named Glados died which resulted in me taking on a backup which at the time was a 2019 Macbook Pro.
After a month of hard-fought battle in this proprietory ecosystem, I found one thing that I liked and actually respected in Macbooks from the start. The out of the box battery life. For years, I have optimized each Linux system I have had to have better battery life but it has never really materialized. Four to six hours is max what I would get if I am lucky.
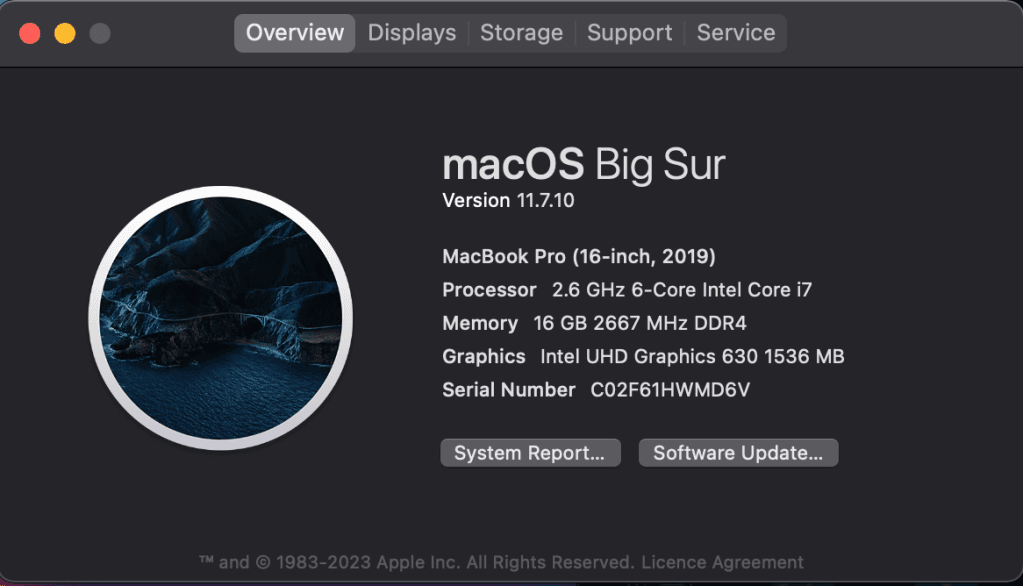
This 2019 Apple Macbook with Intel i7, 16 inch retina display not even running the latest macOS Big Sur version provides 12+ hours of battery life without breaking a sweat. These numbers are conservative. I once lightly worked on MacOS for 3 days straight and still wasn’t able to drain the battery. For these reasons, I might just buy a Macbook but moving on.
Why MacOS can’t acknowledge a Linux Drive?
Officially…
No, it’s not because of sheer ignorance. Although Apple and its fan base already have that toxic trait. Apple’s primary focus is on providing a seamless user experience for its customer base, which primarily uses macOS and iOS devices. They always built their own filesystem which works well with their services such as Time Machine, iCloud, and Spotlight search. According to official documentation, Disk Utility can only support the following the filesystems:
- Apple File System (APFS): The file system used by macOS 10.13 or later.
- Mac OS Extended: The file system used by macOS 10.12 or earlier.
- MS-DOS (FAT) and ExFAT: File systems that are compatible with Windows.
This supported list misses NTFS and EXT4 filesystems respectively which is what Windows & Linux primiarily use for their drives.
Actually…
MacOS originally using HFS+ and now APFS (Apple File System) which are optimized for the hardware and software ecosystem of Apple’s products. APFS provides in built features like snapshots for the Time Machine service,
Ext4 supports features like journaling, which helps protect against data corruption. APFS supports snapshots, enabling the system to capture a read-only instance of the file system at a given point in time. APFS allows for space sharing within a container, meaning multiple volumes can share the same storage space and grow or shrink dynamically. Additionally, APFS can create file clones instantly without taking up additional space, which is efficient for data management.
APFS offers native encryption with support for full-disk encryption, multi-key encryption with per-file keys for file data, and separate keys for sensitive metadata. With features like this, adding compatiblity for another competing filesystem with a larger user base doesn’t make business sense for Apple to provide native support to EXT4 filesystems.
What next?
When Glados, my PopOS 22.04 Linux machine died. I needed to immediately go and buy an SSD adapter for my M.2 NVMe SSD so I can transfer the data to the Macbook.
I got one from a local computer store for 20 dollars since I was running against time. Glados had left me without a working system just two days before a 30 day trip to Morocco and Tenerife that I was undertaking for New Year’s.
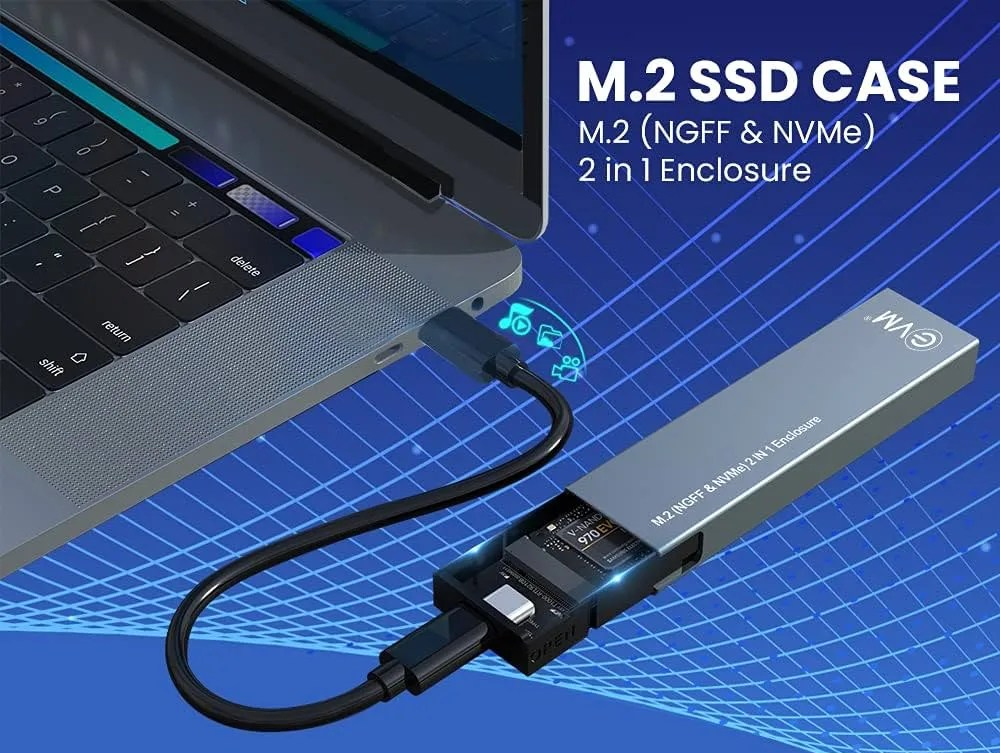
The enclosure is a USB-C to USB-C/USB-A port where you can attach the SSD. The product came with a cooling pad which has been extremely helpful since the SSD really clocks in high temperatures when on load.
(Recommended) Paragon EXTfs: Freemium, fastest, no terminal
New to ecosystem I did know about the missing EXT4 support but I have debugged plenty of these isuses in my full time work. Looking online, I found several things I could try but I went with a free-trial of Paragon EXTfs for macOS. You can use it free for 15 days, after which you need to pay for it to continue using it.
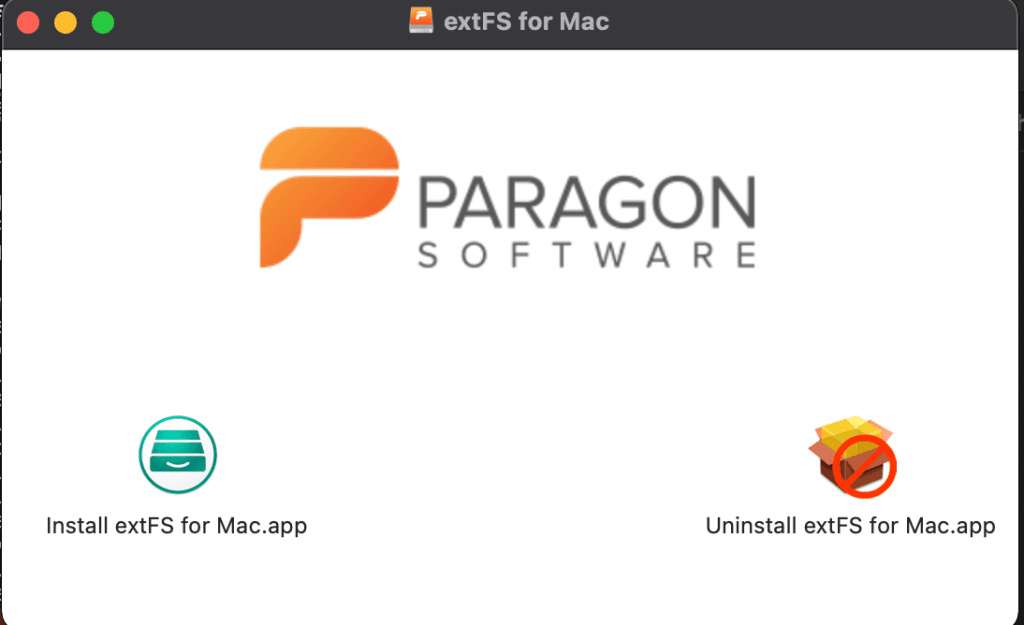
If you are looking for a fast, “just works” solution without a terminal that you need for a limited time then this will do just fine. The software installs seamlessly and asks for system access. The drive showed up instantly, ready to be mounted to the system for read/write operations. The latter being more complex even when I used to access Linux drives on NTFS filesystems. I think there I used a software too called Linux Reader, since I dislike working on Powershell.
Ext4fuse & MacFuse: Free, time to setup, terminal based
To get EXT4 drives to show up using a compatiblity layer that can help you access more filesystems on MacOS you can use the open-source project called MacFuse and Ext4fuse.
- Download MacFuse official website. Click on the install macFUSE and start the installation process when the installer window opens.
- Follow along the steps clicking allow wherever it tells you to. Read the fine print carefully.
- Once the installation finishes, we need to install ext4Fuse
# Install using Brew
brew install ext4fuse

# Install Homebrew if you haven't
/bin/bash -c "$(curl -fsSL https://raw.githubusercontent.com/Homebrew/install/HEAD/install.sh)"
4. Once everything installs, restart the system for system extensions to be applied. Once finished, let’s see if it all works. Plug in the drive, run the following commands. diskutil will give you the list of available drives in the system something like this:
vipulgupta2048@2048s-pro ~ % diskutil list
/dev/disk0 (internal, physical):
#: TYPE NAME SIZE IDENTIFIER
0: GUID_partition_scheme *1.0 TB disk0
1: EFI EFI 314.6 MB disk0s1
2: Apple_APFS Container disk1 1.0 TB disk0s2
/dev/disk1 (synthesized):
#: TYPE NAME SIZE IDENTIFIER
0: APFS Container Scheme - +1.0 TB disk1
Physical Store disk0s2
1: APFS Volume MacintoshHD 15.3 GB disk1s1
2: APFS Snapshot com.apple.os.update-... 15.3 GB disk1s1s1
3: APFS Volume Preboot 312.0 MB disk1s2
4: APFS Volume Recovery 621.4 MB disk1s3
5: APFS Volume VM 20.5 KB disk1s4
6: APFS Volume MacintoshHD - Data 82.8 GB disk1s5
/dev/disk2 (disk image):
#: TYPE NAME SIZE IDENTIFIER
0: GUID_partition_scheme +143.7 MB disk2
1: Apple_HFS ParagonFS.localized 143.7 MB disk2s1
/dev/disk3 (external, physical):
#: TYPE NAME SIZE IDENTIFIER
0: GUID_partition_scheme *512.1 GB disk3
1: EFI SYSTEM 1.3 GB disk3s1
2: Microsoft Basic Data Windows 56.6 GB disk3s2
3: Microsoft Basic Data Vipul 107.9 GB disk3s3
4: Linux Filesystem 98.2 GB disk3s4
5: Windows Recovery 236.2 GB disk3s5
6: Linux Swap 10.8 GB disk3s6
7: Windows Recovery 1.0 GB disk3s7Looking at the list, we only want to see the external, physical disk because that’s what we just connected. Here, the Linux Filesystem is the /root partition, Linux Swap is swao and since I remember the size of my /home partition was 200+ gigs then that would be Windows Recovery for some reason. Write down your partition ID that you intend to mount. Mine is /dev/disk2s5 Run the following command line:
sudo ext4fuse /dev/disk2s5 ~/tmp/linux-home -o allow_other
This command will mount the EXT4 partition to your Macbook’s tmp folder in your user folder. You can check now to see a linux-home folder exists with all your files in it. This what helped me in getting access to my data when my system failed.
Update: NTFS Drives also don’t fully work
NTFS drives are unsupported in Sonoma MacOS v14. It seems previously they did use to work but Apple has removed the write capability for NTFS-formatted drives completely. I found a really good application that handles the mount/unmount of drives using NTFS-3G and Macfuse libraries called Mounty.
I used to try mounting NTFS drives using the fstab Disk UUID method as detailed in this OS X Daily mentioned with a follow up article and then using https://apple.stackexchange.com/questions/116022/cannot-edit-etc-fstab-to-let-ntfs-drives-write
Miscellaneous Tips
- How to eject drives: https://www.alphr.com/eject-external-hard-drive-mac
- Show all hidden files in Finder by default.
defaults write com.apple.finder AppleShowAllFiles -boolean true; killall Finder;
Conclusion
In conclusion, navigating the complexities of different file systems across operating systems can be a daunting task, especially when transitioning from Linux to macOS. Beyond the opearting systems, file systems and ecosystems an undeniable fact of digital life is regular backups and a sound backup strategy.
The sudden demise of Glados serves as a reminder to the laws of Murphy in devices. Even the most trusted hardware can fail unpredictably, often at the most inopportune times. Implementing a robust backup strategy is not just about safeguarding data; it’s a lifeline that ensures continuity and peace of mind in our digital lives. Regular backups to external drives, cloud services, or even multiple locations can mean the difference between a minor inconvenience and a catastrophic loss of valuable data. That’s what I have been writing about in these Future Vipul guides.

Embracing a backup routine is an afterthought these days. People forget that data is more than just bits and bytes these days; it’s the digital embodiment of our memories, work, and creativity. In life, you don’t really know what you have until it’s gone… which is usually right around the time you realize you should’ve backed it up yesterday.
Tweet
Good to keep writing, till then live in the mix.