

Dive into a fun, articulate tutorial where we dive deep into clearing mysteries of working with ReactJS, the powerful and simple Hasura GraphQL Engine. Let’s jump right in.
The last time I worked on Javascript for more than a few hours was on my first project with OpenGIS where I was tasked with implementing the Google Maps API to display a few markers. My life in frontend was simple then. I lived in blissful ignorance. Away from long harsh NPM installs, new updates that disrupt the Javascript ecosystem every month or so, or going through any of the documentation that comes with it.
Right before starting 2019, I had an urge to learn something new. And what’s better than to write about my experience through this quick tutorial.
I will go over the important bits of what the tutorial has in store for you. This tutorial is for a developer, looking to get started on GraphQL, wanting to integrate Apollo, Relay etc. and want to start building on Hasura GraphQL Engine as fast as possible. We will be covering everything from the basics to providing you with more resources for your journey ahead. I got you covered. Let’s go.
Step 0: Building the Application from the ground up.
Most tutorials would throw you directly into a pre-built, tested and deployed react app and expect you to already understand every line of code. Or some would actually help you build one file by file but the tutorial can’t possibly cover every aspect of React that you would want or need to make an app. Keeping in mind the ton of new features that get added, removed and replaced every update of React. And tutorials can become easily outdated. 3 times out of 10 the tutorial I was referring to while building my react application was outdated. For a beginner, this could be exceedingly frustrating.
I being am more of a documentation person myself and loved to take my time reading through the fine text. But, here I would seriously recommend a video series that helps you with the development process, understanding every single component of the app methodically by building and tweaking it myself. Check out the React Beginner Course by Wes Bos https://reactforbeginners.com
In my version of the same app, we will be implementing GraphQL on a Postgres database by using the awesome Hasura GraphQL Engine, serving queries using Apollo and authenticating through Firebase. Here’s a link to my GitHub repository. You can check how the application looks and feels, fork it and clone it for later experimenting. Check out the readme for helpful resources and links, and install the node dependencies by running the command given below in the project folder.
npm installSee you after a week of videos. You have a react application now. You ready to play with GraphQL?
Step 2: Understanding GraphQL, Hasura’s GraphQL Engine and its role here.
GraphQL, why should I care?
GraphQL is a query language for APIs and runtime for fulfilling those queries with your existing data. In simple English, its the next big thing after REST API, here a cool video to tell you why. GraphQL provides a complete and understandable description of the data that you receive from your server over the internet. Giving clients the power to ask for exactly what they need and nothing more, henceforth effectively reducing the size of each request that is being made by the client resulting in high-performance applications.

API‘s or (REST API) are interfaces that you request information from, and they respond by sending you formatted data in JSON or XML to your query. Pretty basic right. These API’s would fetch information from a database. And that database would be hosted on a server. Created by defining several components like keys, columns, rows, etc. etc. This is where Hasura comes in to make your life easier by serving backed as a service.
Here, GraphQL is the REST API, and Hasura’s GraphQL Engine is the server. Hasura GraphQL engine is a server that handles your GraphQL queries over a Postgres database and reducing the time it takes your app to be production ready, helping you work more on the code rather on the backend. It comes with a UI that lets you create, view and modify tables of your database with ease in just a few clicks.

Here’s a complete list of features and the official documentation regarding Hasura’s GraphQL Engine. Refer to my repository for more resources. I keep it updated with the best blogs, and tutorials for the application.
Step 3: Baking your very own Hasura GraphQL server
Heroku has you covered to deploy Hasura’s GraphQL Engine for absolutely free. I love how it is set up to be a one-click link. Here’s one for you down below. Follow the steps that come next to set up your very own server.
- Deployment – Click on the link to deploy GraphQL Engine on Heroku with the free Postgres add-on. The name that you enter will become the URL which you will be using as an endpoint in your application.
- Hasura console – Next up, visit https://app-name.herokuapp.com (replace with your app name) to open the admin console. This URL is your ENDPOINT./
- Create your Database – To run our queries we would be needing a database from where our data will be fetched. Head over to the `Data` tab on the top and start by creating a table. Here’s a simple guide to help you with the same. Once, the table is created. Add some sample data for you to query through the “Insert Row” tab.
- Running your first query – Now, with the table created. It’s time to come back to the GraphiQL tab and start querying. So, there are 3 types of requests you can make in GraphQl.
- Query – Fetching data from the server. Basically like GET.
- Mutation – Used to modify data on the server.
- Subscription (NEW) – A query where the client receives an event whenever the value of any field changes upstream. Best example – Notification you get when someone is typing a message on Whatsapp. And you see “X is typing” that’s when you know a Subscription or Real-time tech is in place that constant parses and updates state from backend to frontend.

Being in a development phase, I chose not to add access tokens or securing my endpoint for that matter. But, if you like to do it. Hasura has it set up to the point for making it look like child’s play to you. You can do a lot in the free tier of Heroku so be sure to try/test and implement all features that Hasura has to offer.
Step 4: Let’s Integrate!
The thing you have been waiting for. Till now, we have learned to build a react app, studied about GraphQL and Hasura’s GQL Engine and even deployed our own awesome server, did a few queries on that. That’s all okay until now. You would be pleased to know that this next part is actually the simplest. Integrating GraphQL components into a react app is like butter melting on a hot pan (All these food references make me hungry)
I would be going over some approaches that you could follow on while integrating GraphQL into ReactJS. Here’s the first that I find to be really efficient as well as flexible.
1. Using Axios to Request
For people who don’t know what Axios is, it’s like the Requests package that we have in Python with the same functionality but in JavaScript. Axios is a lightweight HTTP client based similar to a Fetch API. Axios is promise-based async/await library for the readable asynchronous code. Here’s a code snippet on how I used it to get some data out the table regarding fishes to display it on my webpage on load.
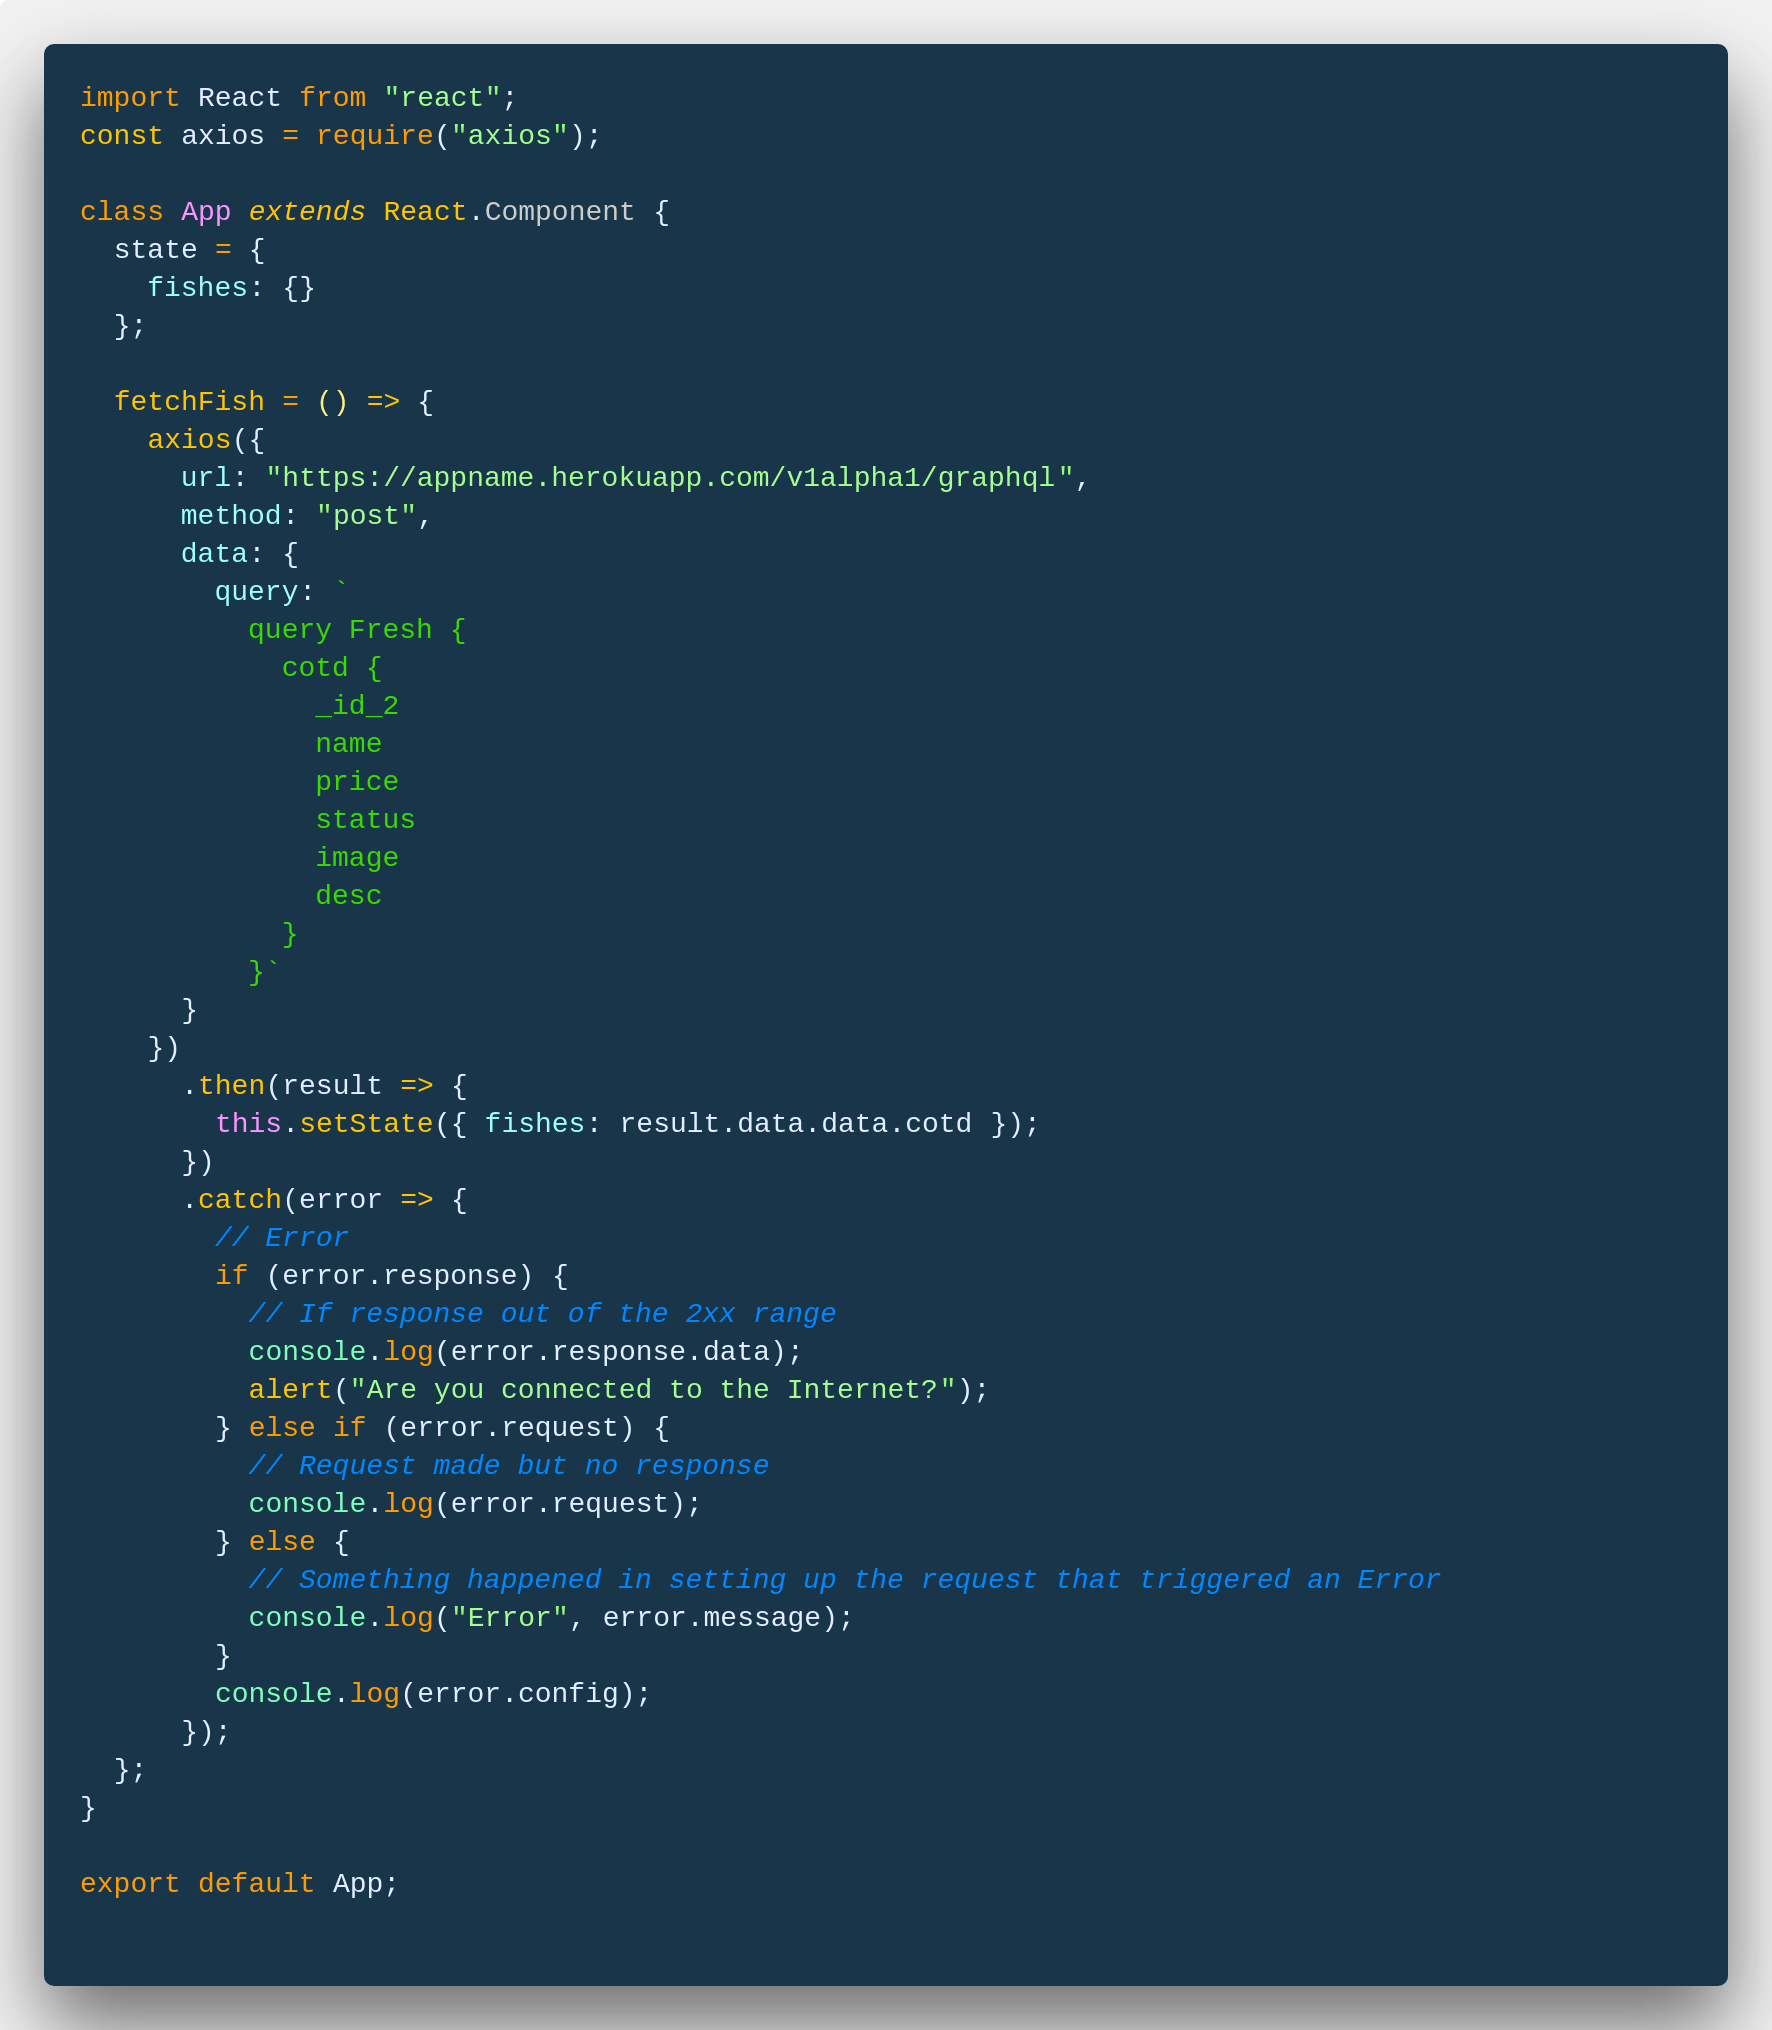
Now, I am no expert in the Javascript ecosystem. This suited my use case of having a light query that works on app load. After reading this, I felt this method to be by far the simplest of them all. Here’s some explanation of the code that can be found here in App.js of React-Cotd.
After importing Axios, React and creating a state to store all my fishes. We created a function, fetchFish() to make a request. The Uniform Resource Locator, notes the endpoint that we need to send our request to. Enter the URL of the endpoint that you created, you can also specify the method you want the request to be. We will use POST here. Data that you will be sending through is your GraphQL query. With the then keyword, we are handling our data and using the setState() function in ReactJS saving the same into our state. After then for good measure, you can add error handling as well that would help you debug errors. And that’s about it. Simple, right.
2. Taking help from big brother, Apollo
This step is one of the better, more sophisticated ones out there that work perfectly with Hasura’s GraphQL Server. Apollo Client us a way to use GraphQL to build client applications. The client is designed to help you quickly build a UI that fetches data with GraphQL and can be used with any JavaScript front-end. And you guessed it right, it works and is recommended by Hasura. I won’t be writing about it much since the docs actually cover it all. Here’s something for your quickstart with Apollo Client.
3. Working with withApollo()
My favorite way to work with GraphQL. Thanks to the community champion in Hasura’s awesome community, Elitan for the easy and efficient way to make your requests. Let’s jump into this code snippet below.

So, my use case of withApollo() is executing a query or a mutation when a button is clicked. Like, most REST API’s are set to work when being developed. Here, as you can see the createFish() function gets executed with the onSubmit action of the form fish-edit. When a fish gets added, a mutation is made to the database to add the details of the new fish. This request passes through withApollo that we have added on to our component in the last line while exporting. Going deeper into the createFish() function, we have used props to call on the client and pass our GraphQL mutation, an important thing to notice here is how we are passing the variables into the mutation. Later, we are extracting the resulting and doing some error catching for debugging. I think, this really keeps the user in control of the queries that they want to execute and also saves us a lot of trouble.
4. ApolloConsumer()
For the sake of completion of my integration step of Hasura’s GraphQL Engine into your react app, I want to add another way to work with GraphQL and that is with ApolloConsumer() component. Which gives you access to the Apollo Client anywhere that you want in your application. Here’s a code snippet that I tweaked into my application but was never used. Thanks to the comprehensive post by Dilip Kumar.
import React, { Component } from 'react';
import { ApolloConsumer } from 'react-apollo';

class DelayedQuery extends Component {
  state = { dog: null };

  onDogFetched = dog => this.setState(() => ({ dog }));

  render() {
    return (

        {client => (
Well, that’s about it for. We have seen in this part as to how to add Hasura’s GraphQL Engine in your React App. In the next parts, we will go over some nuggets of troubleshooting problems the arise on the deployment of multipage React application on Heroku and how we use the swiss army knife of the web called Firebase to authenticate our users into the store.
Till then if you have any doubts, corrections or questions regarding how to integrate GraphQL into your app. I recommend you head over down to the comments or post your queries on the Hasura’s forum on Discord. Till then, live in the mix guys.